나만의 유튜브 사이트 만들기
소개
안녕하세요! 웹스토리보이입니다. 이 강의는 React 프레임워크와 YouTube API를 이용하여 자신만의 간단한 영상 사이트를 만들어보겠습니다. React의 기본 개념을 이해하고, 컴포넌트를 구조화하고 상태를 관리하는 방법을 학습하게 될 것입니다. 또한 YouTube Data API를 활용하여 외부 데이터를 가져오는 방법을 익히고, API 응답을 처리하여 사용자에게 의미 있는 정보를 제공하는 방법을 이해하게 됩니다. 이로써 자신만의 유튜브 사이트를 만들고, 활용해보는 것을 목표로 합니다. 그럼 한번 시작해볼까요? 🥳
인덱스
- 1. 셋팅하기
- 1_1. Node.js 설치
- 1_2. Vscode 설치
- 1_3. React.js 설치
- 2. 라이브러리 설치하기
- 2_1. 폴더 정리하기
- 2_2. 라이브러리 설치하기
- 3. Git 연동하기
- 3_1. 저장소 만들기
- 3_2. 모든 파일 올리기
- 3_3. 깃 상태 확인하기
- 4. SCSS 셋팅하기
- 4_1. SCSS 설정하기
- 4_2. style.scss 설정하기
- 4_3. fonts.scss 설정하기
- 4_4. vars.scss 설정하기
- 4_5. reset.scss 설정하기
- 4_6. mixin.scss 설정하기
- 4_7. common.scss 설정하기
- 5. 페이지 만들기
- 5_1. 페이지 만들기
- 5_2. 페이지 컴퍼넌트 만들기
- 6. 섹션 컴퍼넌트 구조화하기
- 6_1. 전체 레이아웃 만들기
- 6_2. 섹션 컴퍼넌트 만들기
- 7. 헤더 영역 완성하기
- 7_1. 헤더 영역 구조 잡기
- 7_2. 헤더 영역 디자인 작업
- 8. 헤더 영역 데이터 작업
- 8_1. 헤더 영역 데이터 작업
- 8_2. 반복문과 map()
- 8_3. 메뉴 활성화하기
- 8_4. 컴퍼넌트 세부화 시키기
- 9. 컴퍼넌트 비동기 작업
- 8_1. 컴퍼넌트 props 사용하기
- 8_2. React.Suspense 사용하기
- 10. 페이지 SEO 작업
- 10_1. 메인 페이지 SEO 설정하기
- 10_2. 모든 페이지 SEO 설정하기
- 11. 메인 콘텐츠 작업
- 11_1. 검색 컴퍼넌트 작업하기
- 11_2. 메인 컴퍼넌트 작업하기
- 12. 추천 영상 작업
- 12_1. 메인 추천 영상 작업
- 12_2. 추천 영상 반응형 작업
- 12_3. 추천 영상 페이지 작업
- 13. 추천 개발자 작업
- 13_1. 메인 추천 개발자 작업
- 13_2. 추천 개발자 페이지 작업
- 14. 메인 섹션 나머지 콘텐츠 작업
- 14_1. 웹디자인 기능사 컴퍼넌트 작업
- 14_2. 웹표준 사이트 컴퍼넌트 작업
- 14_3. GSAP 사이트 컴퍼넌트 작업
- 14_4. 포트폴리오 사이트 컴퍼넌트 작업
- 14_5. 유튜브 사이트 컴퍼넌트 작업
- 15. 비디오 컴퍼넌트 통합 작업
- 15_1. 공통 요소 컴퍼넌트 만들기
- 15_2. Swiper 슬라이드 만들기
- 15_3. 로딩 효과 넣기
15. 비디오 컴퍼넌트 통합 작업
15_1. 공통 요소 컴퍼넌트 만들기
현재 웹디자인 기능사, 웹표준 사이트, GSAP, 포트폴리오 사이트, 유튜브 사이트는 비디오를 보여주는 구조이기 때문에 코드가 동일합니다. 받아오는 데이터만 다르기 때문에 이 부분을 통합할 수가 있습니다.
pages > Home.jsx 파일을 만들겠습니다.
import React from 'react'
import Main from '../components/section/Main'
import Today from '../components/contents/Today'
import Developer from '../components/contents/Developer'
import VideoSlider from '../components/videos/VideoSlider'

import { webdText } from '../data/webd'
import { websiteText } from '../data/website'
import { gsapText } from '../data/gsap'
import { portfolioText } from '../data/portfolio'
import { youtubeText } from '../data/youtube'

const Home = () => {
    return (
        <Main
            title = "웹스토리보이 유튜브"
            description="웹스토리보이 유튜버 사이트에 오신 것을 환영합니다.">

            <Today />
            <Developer />
            <VideoSlider videos={webdText} title="😮 웹디자인기능사 준비는 이걸로!" id="webd" />
            <VideoSlider videos={websiteText} title="😛 웹표준 사이트 만들기 기초 다지기" id="website" />
            <VideoSlider videos={gsapText} title="🤓 GSAP 패럴랙스 효과를 하고 싶다면!" id="gsap" />
            <VideoSlider videos={portfolioText} title="🤗 포트폴리오 만드는 방법을 공유합니다." id="portfolio" />
            <VideoSlider videos={youtubeText} title="😱 지금 이 코딩을 영상으로" id="youtube" />
        </Main>
    )
}

export default Home
components > videos > VideoSlider.jsx 파일을 추가합니다.
import React from 'react'
import { Link } from 'react-router-dom'

const VideoSlider = ({ videos, title, id }) => {
    return (
        <section id={id} >
            <h2>{title}</h2>
            <div className='video__inner'>
                {videos.map((video, key) => (
                    <div className="video" key={key}>
                        <div className="video__thumb play__icon">
                            <Link to={`/video/${video.videoId}`}>
                                <img src={video.img} alt={video.title} />
                            </Link>
                        </div>
                    </div>
                ))}
            </div>
        </section>
    )
}

export default VideoSlider
훨씬 더 심플해졌습니다. 이런 부분이 리액트의 장점이라고 할 수 있습니다.
15_2. Swiper 슬라이드 만들기
VideoSlider 부분에 swiper를 설정하겠습니다.
swiper는 처음에 설치한 거 기억하시죠?
components > videos > VideoSlider.jsx를 설하겠습니다.
import React from 'react'
import { Link } from 'react-router-dom'

import { Swiper, SwiperSlide } from 'swiper/react';
import 'swiper/css';
import 'swiper/css/navigation';

import { Navigation } from 'swiper/modules';

const VideoSlider = ({ videos, title, id }) => {
    return (
        <section id={id} >
            <h2>{title}</h2>
            <div className='video__slider'>
                <Swiper
                    slidesPerView={1}
                    spaceBetween={20}
                    navigation={true}
                    modules={[Navigation]}
                    className={`mySwiper-${id}`}
                    breakpoints={{
                        640: {
                            slidesPerView: 2,
                            spaceBetween: 20,
                        },
                        768: {
                            slidesPerView: 3,
                            spaceBetween: 20,
                        },
                        1024: {
                            slidesPerView: 4,
                            spaceBetween: 20,
                        },
                        1600: {
                            slidesPerView: 4,
                            spaceBetween: 20,
                        },
                    }}
                >
                    {videos.map((video, key) => (
                        <SwiperSlide key={key}>
                            <div className="video" key={key}>
                                <div className="video__thumb play__icon">
                                    <Link to={`/video/${video.videoId}`}>
                                        <img src={video.img} alt={video.title} />
                                    </Link>
                                </div>
                            </div>
                        </SwiperSlide>
                    ))}
                </Swiper>
            </div>
        </section>
    )
}

export default VideoSlider
scss > section > _swiper.scss 파일을 만들겠습니다.
style.scss 에 추가도 잊지마세요!
.swiper-button-prev.swiper-button-disabled,
.swiper-button-next.swiper-button-disabled {
opacity: 0 !important;
}
.swiper-button-next:after,
.swiper-button-prev:after {
color: #fff !important;
font-size: 30px !important;
}
.swiper-pagination-bullet {
background-color: #fff !important;
}
.swiper-button-next {
background-color: #00000069;
right: 0 !important;
top: 40% !important;
}
.swiper-button-prev {
background-color: #00000069;
left: 0 !important;
top: 40% !important;
}
.video__slider .swiper-button-next {
top: 50% !important;
}
.video__slider .swiper-button-prev {
top: 50% !important;
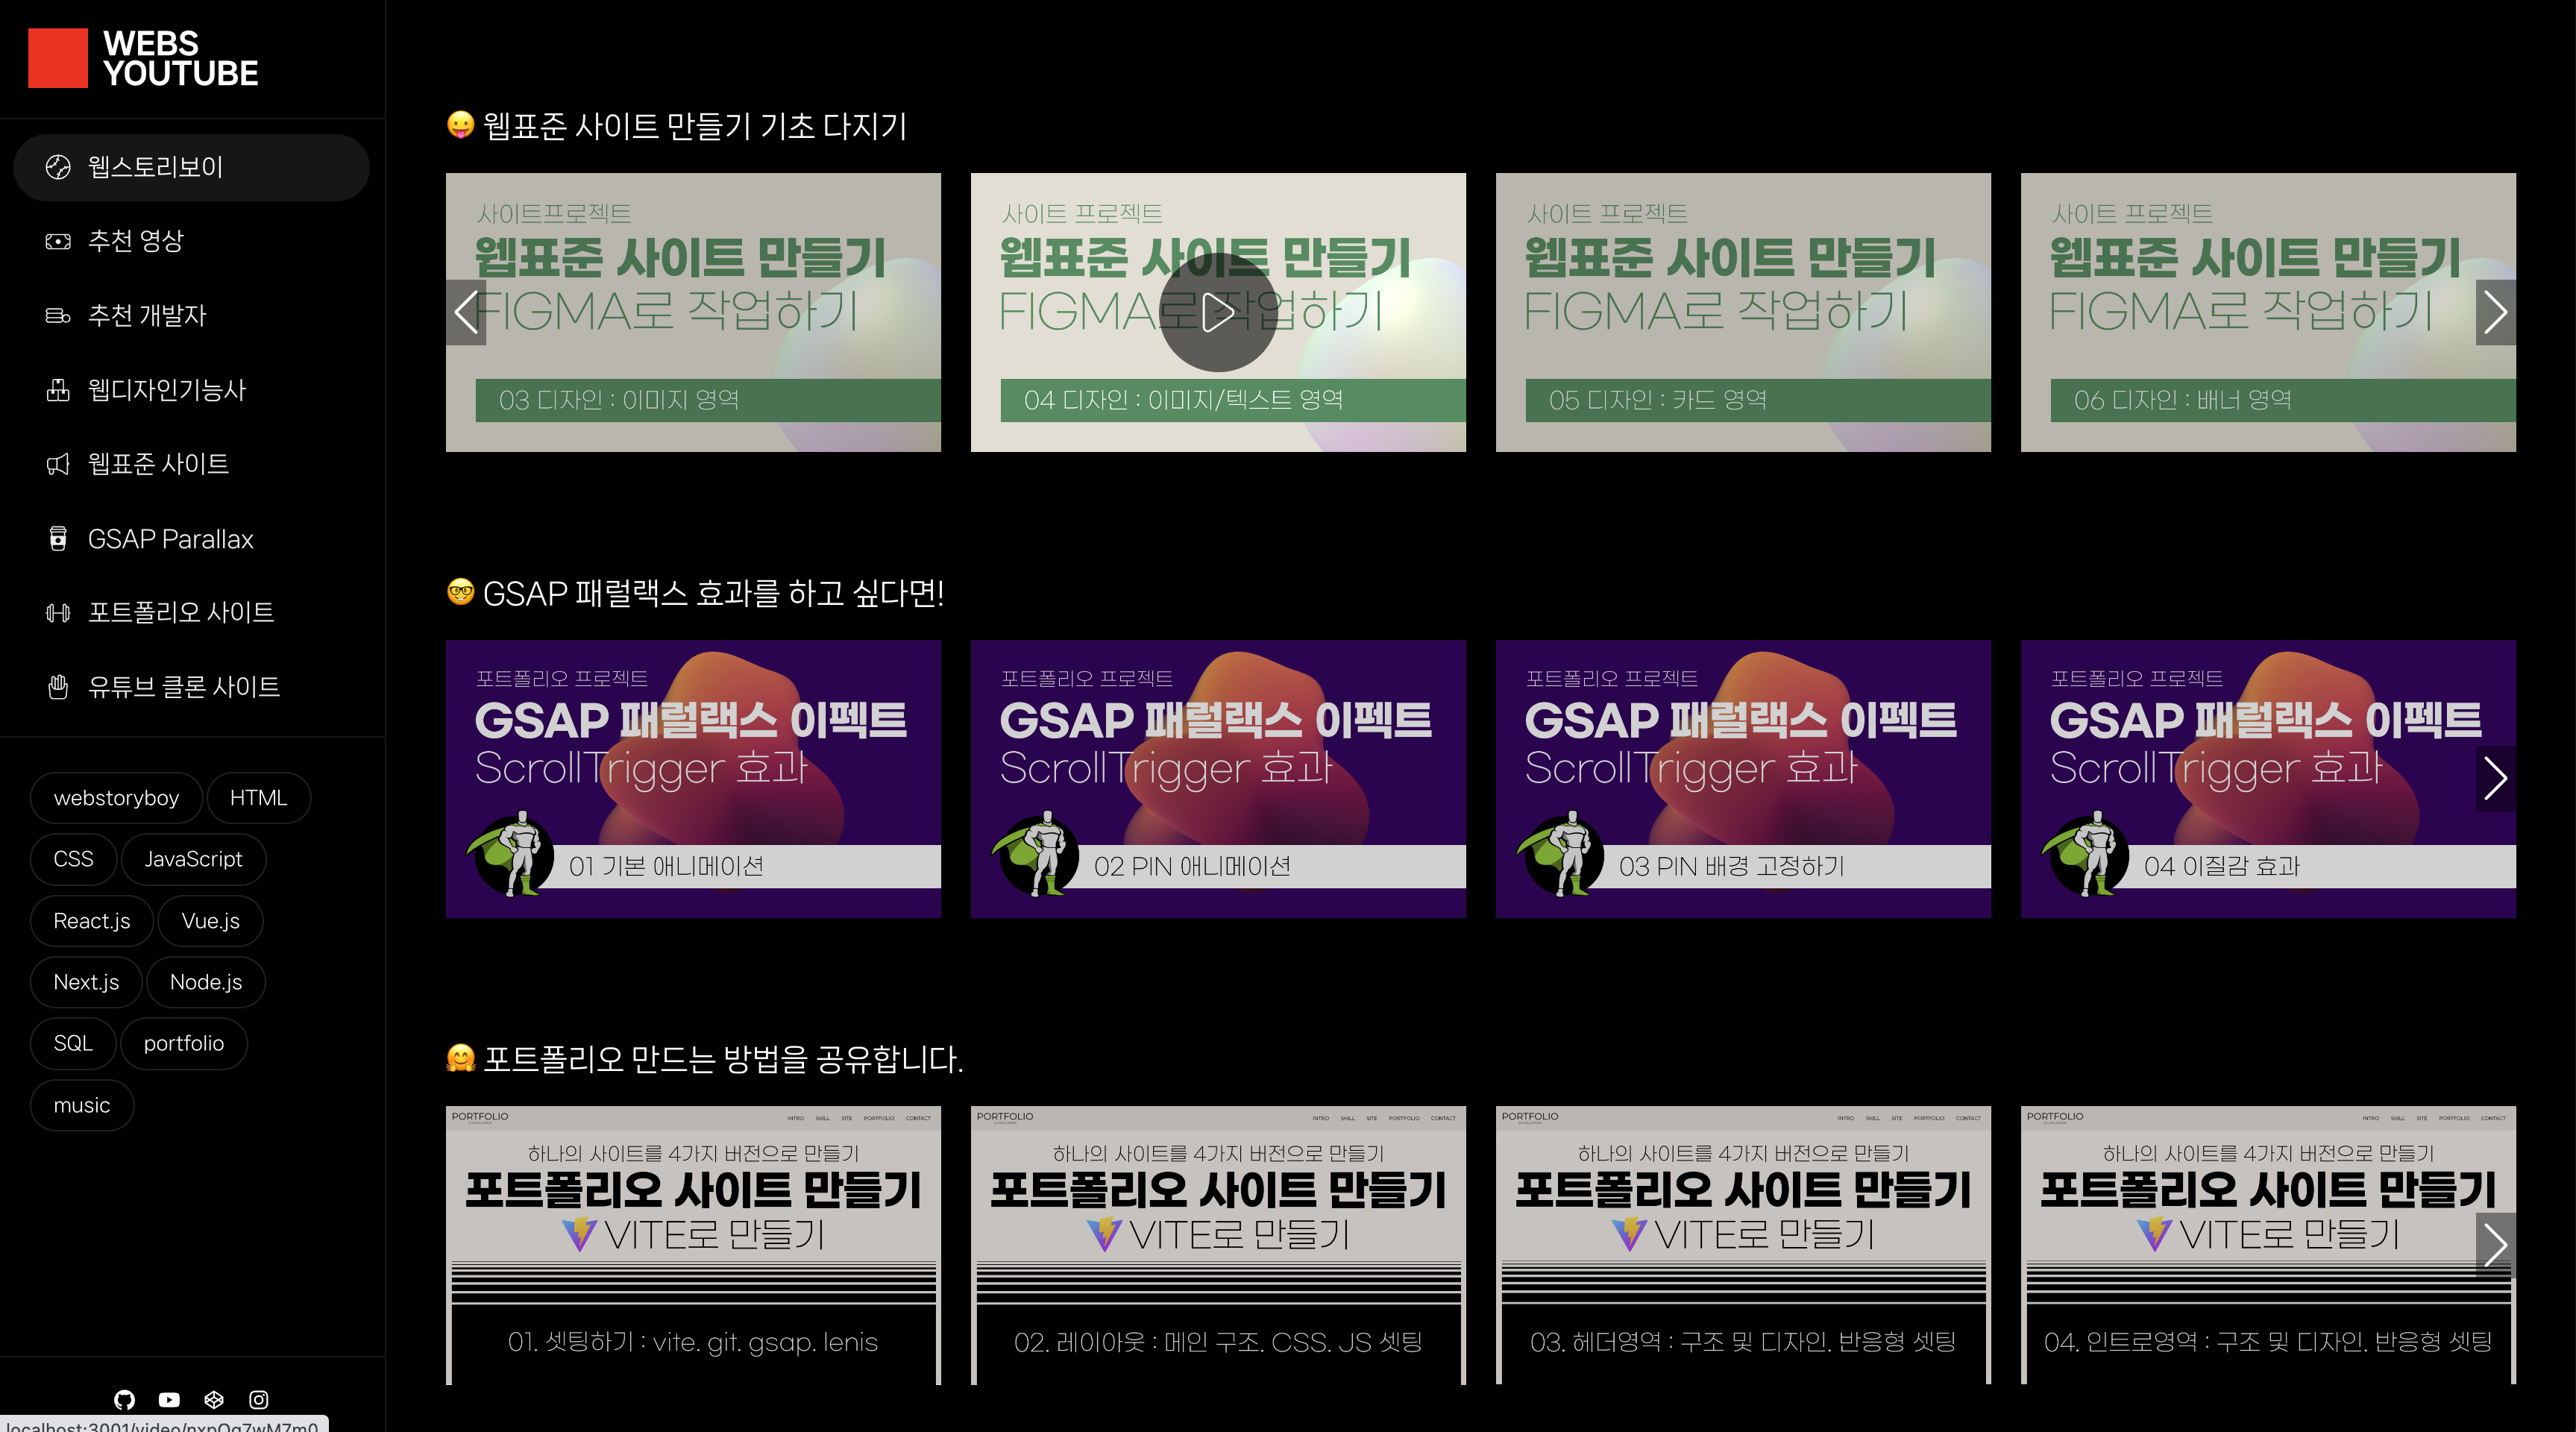
}이미지 슬라이드 형식으로 변경된 것을 확인 할 수 있습니다.
15_3. 로딩 효과 넣기
사이트가 로딩되면 조금 더 부드럽게 연출하기 위해서 로딩 효과를 살짝 넣어보겠습니다.
components > videos > VideoSlider.jsx를 수정하겠습니다.
import React, { useEffect, useState } from 'react'
import { Link } from 'react-router-dom'

import { Swiper, SwiperSlide } from 'swiper/react';
import 'swiper/css';
import 'swiper/css/navigation';

import { Navigation } from 'swiper/modules';

const VideoSlider = ({ videos, title, id }) => {
    const [loading, setLoading] = useState(true);

    useEffect(() => {
        setTimeout(() => {
            setLoading(false);
        }, 500);
    }, []);

    const youtubeClass = loading ? 'isLoading' : 'isLoaded';

    return (
        <section id={id} className={youtubeClass}>
            <h2>{title}</h2>

            <div className='video__slider'>
                <Swiper
                    slidesPerView={1}
                    spaceBetween={20}
                    navigation={true}
                    modules={[Navigation]}
                    className={`mySwiper-${id}`}
                    breakpoints={{
                        640: {
                            slidesPerView: 2,
                            spaceBetween: 20,
                        },
                        768: {
                            slidesPerView: 3,
                            spaceBetween: 20,
                        },
                        1024: {
                            slidesPerView: 4,
                            spaceBetween: 20,
                        },
                        1600: {
                            slidesPerView: 4,
                            spaceBetween: 20,
                        },
                    }}
                >
                    {videos.map((video, key) => (
                        <SwiperSlide key={key}>
                            <div className="video" key={key}>
                                <div className="video__thumb play__icon">
                                    <Link to={`/video/${video.videoId}`}>
                                        <img src={video.img} alt={video.title} />
                                    </Link>
                                </div>
                            </div>
                        </SwiperSlide>
                    ))}
                </Swiper>
            </div>
        </section>
    )
}

export default VideoSlideruseEffect는 React 함수 컴포넌트에서 비동기 작업을 수행하거나 부수 효과를 다룰 때 사용되는 특별한 훅(Hook) 중 하나입니다. 주로 컴포넌트의 생명주기 메소드(예: componentDidMount, componentDidUpdate, componentWillUnmount)와 비슷한 역할을 하며, 컴포넌트의 상태나 DOM 업데이트와 관련된 작업을 수행하는 데 사용됩니다.
- 부수 효과 처리: 비동기 작업(데이터 가져오기, API 호출, 타이머 설정 등)을 수행할 수 있습니다. 이러한 작업은 컴포넌트의 렌더링과 독립적으로 처리됩니다.
- 상태 업데이트: useState 훅을 사용하여 상태를 변경하고, 변경된 상태에 따른 추가적인 렌더링을 트리거합니다.
- DOM 조작: 컴포넌트가 화면에 렌더링된 후에 DOM 요소를 조작하거나 이벤트 처리 등을 수행할 수 있습니다.
리액트 훅(React Hook)은 React 버전 16.8부터 소개된 기능으로, 함수형 컴포넌트에서 상태와 다른 React 기능을 사용할 수 있게 해주는 API입니다. 이전에는 상태와 생명주기 메서드를 클래스 컴포넌트에서 사용했지만, 훅을 통해 함수형 컴포넌트에서도 같은 기능을 사용할 수 있게 되었습니다. 아래에 몇 가지 주요 리액트 훅에 대한 설명을 제공합니다
- useState : useState 훅은 상태 관리를 위해 사용됩니다. 함수형 컴포넌트 내에서 상태를 생성하고 업데이트할 수 있게 해줍니다. 예를 들어, const [count, setCount] = useState(0)와 같이 사용할 수 있습니다. count는 현재 상태 값이고, setCount는 상태를 업데이트하는 함수입니다.
- useEffect : useEffect 훅은 부수 효과를 다루기 위해 사용됩니다. 컴포넌트가 마운트, 업데이트, 혹은 언마운트될 때 특정 작업(비동기 작업, 상태 업데이트, DOM 조작 등)을 수행할 수 있습니다.
- useContext : useContext 훅은 컨텍스트를 활용하여 컴포넌트 간에 상태를 공유할 때 사용됩니다. React.createContext로 생성한 컨텍스트를 사용하여 값을 공유하거나 설정할 수 있습니다.
- useReducer : useReducer 훅은 상태 업데이트를 다룰 때 사용됩니다. 클래스 컴포넌트에서 setState 대신 사용할 수 있으며, 복잡한 상태 관리에 유용합니다.
- useRef : useRef 훅은 ref 객체를 생성하고 다룰 때 사용됩니다. 주로 DOM 요소에 접근하거나 다른 목적으로 ref를 사용할 때 활용됩니다.
- useMemo 및 useCallback : useMemo와 useCallback 훅은 성능 최적화를 위해 사용됩니다. useMemo는 계산 비용이 높은 값을 캐시하고, useCallback은 메모이제이션된 함수를 생성합니다.
- Custom Hooks : 사용자 정의 훅을 생성하여 컴포넌트 간 코드 재사용을 간편하게 할 수 있습니다. 예를 들어, 데이터 가져오기, 로컬 스토리지 액세스, 인증 등을 처리하는 훅을 만들 수 있습니다.
css도 추하겠습니다.
scss> > setting > _common.scss에 추가하겠습니다.
// 섹션 로딩 소스
.isLoading {
    opacity: 0;
    transition: opacity 0.5s;
}
.isLoaded {
    opacity: 1;
    transition: opacity 0.5s;
}
마무리
git 올리기
터미널에서 다음과 같이 작성하겠습니다. 새로운 페이지가 올라오는 것을 확인 할 수 있습니다.
webstoryboy@Webstoryboyui-iMac webs-youtube % git add .
webstoryboy@Webstoryboyui-iMac webs-youtube % git status
On branch main
Your branch is up to date with 'origin/main'.

Changes to be committed:
    (use "git restore --staged ..." to unstage)
        new file:   src/assets/scss/section/_swiper.scss
        modified:   src/assets/scss/setting/_common.scss
        modified:   src/assets/scss/style.scss
        new file:   src/components/video/VideoSlider.jsx
        modified:   src/pages/Home.jsx

webstoryboy@Webstoryboyui-iMac webs-youtube % git commit -m "비디오 컴퍼넌트 통합 작업"
[main 322bb7a] 비디오 컴퍼넌트 통합 작업
    5 files changed, 119 insertions(+), 11 deletions(-)
    create mode 100644 src/assets/scss/section/_swiper.scss
    create mode 100644 src/components/video/VideoSlider.jsx
webstoryboy@Webstoryboyui-iMac webs-youtube % git puth -u origin main
git: 'puth' is not a git command. See 'git --help'.

The most similar command is
        push
webstoryboy@Webstoryboyui-iMac webs-youtube % git push -u origin main
Enumerating objects: 26, done.
Counting objects: 100% (26/26), done.
Delta compression using up to 8 threads
Compressing objects: 100% (14/14), done.
Writing objects: 100% (15/15), 2.55 KiB | 2.55 MiB/s, done.
Total 15 (delta 8), reused 0 (delta 0), pack-reused 0
remote: Resolving deltas: 100% (8/8), completed with 8 local objects.
To https://github.com/webstoryboy/webs-youtube.git
    075a6fb..322bb7a  main -> main
branch 'main' set up to track 'origin/main'.
메인 섹션의 공통 요소를 작업하였습니다. 다음에는 나머지 부분도 마무리 하겠습니다. 오늘도 수고하셨습니다. 😘
예제 목록
- 1. 나만의 유튜브 사이트 만들기 : 셋팅하기
- 2. 나만의 유튜브 사이트 만들기 : 라이브러리 설치하기
- 3. 나만의 유튜브 사이트 만들기 : Git 연동하기
- 4. 나만의 유튜브 사이트 만들기 : SCSS 셋팅하기
- 5. 나만의 유튜브 사이트 만들기 : 페이지 만들기
- 6. 나만의 유튜브 사이트 만들기 : 섹션 컴퍼넌트 구조화하기
- 7. 나만의 유튜브 사이트 만들기 : 헤더 영역 완성하기
- 8. 나만의 유튜브 사이트 만들기 : 헤더 영역 데이터 작업
- 9. 나만의 유튜브 사이트 만들기 : 컴퍼넌트 비동기 작업
- 10. 나만의 유튜브 사이트 만들기 : 페이지 SEO 작업
- 11. 나만의 유튜브 사이트 만들기 : 메인 콘텐츠 작업
- 12. 나만의 유튜브 사이트 만들기 : 추천 영상 작업
- 13. 나만의 유튜브 사이트 만들기 : 추천 개발자 작업
- 14. 나만의 유튜브 사이트 만들기 : 메인 섹션 나머지 콘텐츠 작업
- 15. 나만의 유튜브 사이트 만들기 : 비디오 컴퍼넌트 통합 작업
- 16. 나만의 유튜브 사이트 만들기 : Swiper 이미지 슬라이드 작업
- 17. 나만의 유튜브 사이트 만들기 : 나머지 페이지 작업
- 18. 나만의 유튜브 사이트 만들기 : 검색 및 유튜브 API 설정하기
- 19. 나만의 유튜브 사이트 만들기 : Rapid API 및 더보기 설정하기
- 20. 나만의 유튜브 사이트 만들기 : 비디오 상세 페이지 만들기
- 21. 나만의 유튜브 사이트 만들기 : 채널 상세 페이지 만들기
- 22. 나만의 유튜브 사이트 만들기 : 버그 고치기
- 23. 나만의 유튜브 사이트 만들기 : 빌드 및 배포하기


댓글